
Expectations DSL builder provides simple yet powerful way how to create parametrized test in JUnit 5 using @TestFactory annotation.
1. Installation
Expectations DSL builder is available on Maven Central.
plugins {
  id 'java'
}

repositories {
    mavenCentral()
}

dependencies {
    testImplementation 'builders.dsl:expectations:1.1.2'
}<!-- Excel -->
<dependency>
<groupId>builders.dsl</groupId>
<artifactId>expectations</artifactId>
<version>1.1.2</version>
<scope>test</scope>
</dependency>2. Usage
2.1. Implicit Assertions
To create a parametrized test using Expectations DSL builder, you need to create a test method returning Expectations and annotate it with @TestFactory annotation.
@TestFactory                                                                        (1)
Expectations basicTest3Fluent() {                                                   (2)
    Calculator calculator = new Calculator();

    return given("a", "b", "c")                                                     (3)
            .are(2, 3, 5)                                                           (4)
            .and(3, 5, 8)
            .and(4, 7, 11)
            .expect(
                    "#a + #b = #c",                                                 (5)
                    (a, b, c) -> calculator.add(a, b) == c                          (6)
            );
}| 1 | Annotate method with @TestFactory |
| 2 | Make the method return Expectations |
| 3 | Define the parameters' headers using given |
| 4 | Define at least one data row using are |
| 5 | Define the test title template using the headers preceded by # to define the placeholders |
| 6 | Define the test |
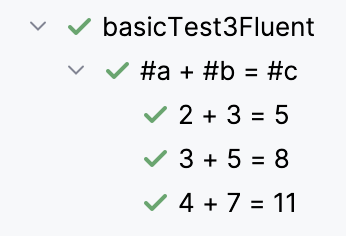
Depending on your IDE the results will look similar to this picture:
| The number of the data columns is currently limited to 10. |
2.2. Explicit Assertions using JUnit 5
You can use any of your favorite frameworks to do the assertions. In this example, you can use JUnit 5 Assertions class instead of simple evaluation of logical expression.
@TestFactory
Expectations basicTest3FluentVerify() {
    Calculator calculator = new Calculator();

    return given("a", "b", "c")
            .are(2, 3, 5)
            .and(3, 5, 8)
            .and(4, 7, 11)
            .verify("#a + #b = #c", (a, b, c) ->
                    assertEquals((int) c, calculator.add(a, b))                     (1)
            );
}| 1 | Use assertEquals to verify the expected value |
3. Immediately Verify Expectations
If you for any reason want to execute all the assertions as a single test method, you can annotate the method with @Test and use evaluate() method on the Expectations object.
@Test                                                                               (1)
void basicTest3FluentFails() {
    Assertions.assertThrows(MultipleFailuresError.class, () -> {
        Calculator calculator = new Calculator();

        given("a", "b", "c")
                .are(2, 3, 6)
                .and(3, 5, 9)
                .and(4, 7, 11)
                .expect("#a + #b = #c", (a, b, c) -> calculator.add(a, b) == c)
                .evaluate();                                                          (2)
    });
}| 1 | Annotate method with @Test |
| 2 | Use evaluate() method to execute all the assertions |
4. Source Location Tracking
When your tests fail, Expectations DSL Builder automatically includes source location information in the error messages to help you quickly identify where the failing test data was defined in your code.
|
Enhanced Error Messages: When a test fails, the error message will show:
This makes debugging much easier, especially when you have many data rows or complex test setups. Example error message: The |
5. Running Specific Test Data Only
During development, you may want to temporarily run only specific data rows instead of all test cases. The only method allows you to do this:
@TestFactory
Expectations testAdditionOnlySpecific() {
    return given("a", "b", "c")
            .are(1, 1, 2)
            .and(2, 2, 4)
            .only(3, 3, 6)  (1)
            .and(4, 4, 8)   (2)
        .expect("#a + #b = #c", (a, b, c) -> a + b == c);
}| 1 | Use only() to mark this row for execution |
| 2 | Rows added with and() before and after only() will be skipped |
You can also start with only() directly from the headers:
@TestFactory
Expectations testAdditionOnlyFirst() {
    return given("a", "b", "c")
            .only(5, 5, 10)  (1)
            .only(6, 6, 12)  (2)
            .and(7, 7, 14)   (3)
        .expect("#a + #b = #c", (a, b, c) -> a + b == c);
}| 1 | Start directly with only() |
| 2 | Multiple only() calls can be chained |
| 3 | and() calls before and after only() are skipped |
|
CI Environment Protection: The This prevents accidentally deploying code with tests that only run a subset of data. |
6. Using More Dynamic Parameters
You can also define the parameter values using Stream or Iterable objects. In that case the given method will alter header and Stream or Iterable to define the data rows.
@TestFactory
Expectations basicTest3WithStreams() {
    Calculator calculator = new Calculator();

    return Expectations.given(
            "a", Stream.of(2, 3, 4),                                                (1)
            "b", Stream.of(3, 5, 7),
            "c", Stream.of(5, 8, 11)
    ).expect("#a + #b = #c", (a, b, c) ->
            calculator.add(a, b) == c
    );
}| 1 | Define the parameters using the pair of header and Stream object |